A Simple & Complete Guide for Beginners to Master Microsoft Word – From Installation to Advanced Tools
Microsoft Word is a really popular tool for word processing today. It’s part of the Microsoft Office suite. So many people use it in different ways: education, business, & content creation. Whether you’re a student writing an essay, a business person making a report, or a freelancer crafting a proposal, Word makes your tasks easier and faster! With features like document creation, editing, & formatting, anyone can whip up professional documents quickly.
Installing Microsoft Word
How to Install & Set Up Microsoft Word
Getting Microsoft Word installed is super easy. You can choose either the Microsoft 365 subscription or the standalone version. Here’s how to begin:
Want to buy it just once? No problem! Here is the Standalone Version, Check out the FastSoftwares, grab the software, and follow along with the installation wizard. It’s that simple!
Navigating the Word Interface
After you’ve installed Word, knowing your way around is super important for getting things done. Here are some key parts:
The Ribbon: This command bar sits at the top of your screen. You’ll see tabs like File, Home, & Insert here. Each tab has commands for formatting things or managing your docs.
Quick Access Toolbar: This handy toolbar is right above the Ribbon. You can customise it! Just add shortcuts for commands you use often like save, undo, & redo
Customising Word Settings
Make Microsoft Word Fit You Better. You can speed up your work by tweaking some settings in Word to match what you like. Here’s what you can do:
Change the Theme: Pick between light & dark modes for comfy viewing.
Auto-Save Setting: Turn on auto-save so you won’t lose any work (trust me, it’s a lifesaver!)
Default Font: Choose a default font that you love so every new document looks just how you want it.
Language Preferences: Set the language options if you’re working in lots of different languages.
Creating & Formatting a New Document:
How to Create Your First Document in Word Making a new document is super simple with Microsoft Word! Follow these steps:
- Create a New Document:
Open Word; then hit File > New. Choose either a blank doc or one of their templates!
- Editing Text:
Start typing away! Highlight your text to change fonts or styles using the formatting toolbar.
- Saving Your Work:
Don’t forget this step! Click File > Save As and store it on your device or in the cloud.
- Basic Formatting:
Use alignment options for paragraphs. Add bullet points or play around with different font styles—make your doc shine!
Inserting Images, Tables, and Charts.
Add Visuals Easily in Your Document Inserting visuals into your documents is super easy!
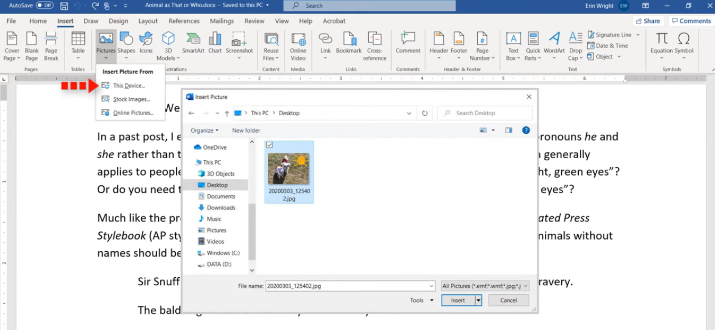
Insert Images: Go to Insert > Pictures; then add images from your computer or online sources. Resize them using the Picture Tools tab afterward!
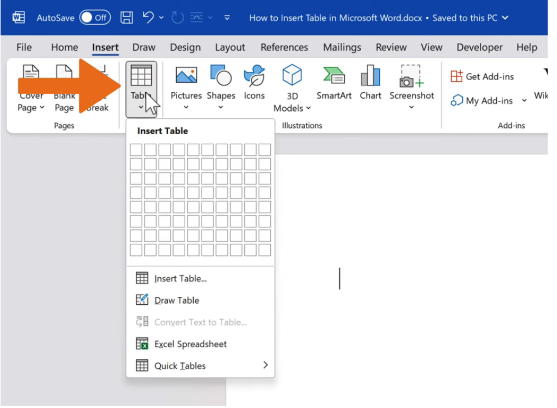
Tables: Want organised data? Just click Insert > Table.
Charts: You can even add charts! Head over to Insert > Chart and pick from pie charts or bar graphs—whatever suits your needs.
Using Advanced Features: Track Changes & Comments
Collaborate Better with Track Changes & Comments when working with others on documents, using Track Changes and Comments makes life easier.
Track Changes: Found under the Review tab—turning this on will let you see edits made by anyone else who works on it.
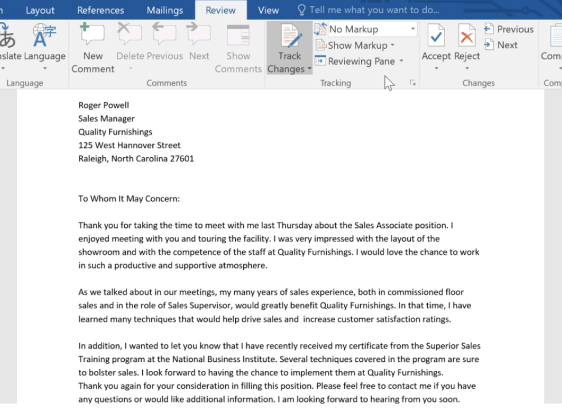
Comments: You can suggest edits without changing the main text by adding comments! Accept or reject changes easily when reviewing documents together.
Mail Merge for Beginners
Sending Personalised Emails and Letters Made Easy Mail Merge helps you send customised bulk messages via linking your document with data (like an Excel list). Here’s how:
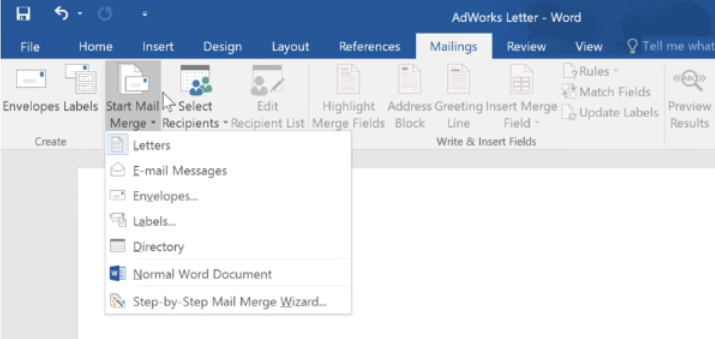
- Create a Mail Merge Document: In Mailings > Start Mail Merge, pick what type of document (like letters).
- Insert Merge Fields: Add placeholders—like names or addresses—using Insert Merge Field.
- Complete the Merge: Finish off to create unique copies for each person on your list!
Advanced Formatting Techniques
If you have longer documented like reports, Microsoft Word has some cool features:
Headers and Footers: Add neat headers and footers—like page numbers—by going to Insert > Header & Footer.
Section Breaks: Want different formats? Use section breaks to switch things up within one document (like mixing portrait & landscape pages).
By following this guide, beginners will learn all about Microsoft Word—from how to install it all the way up to advanced stuff like Mail Merge and Track Changes! Explore these features so that creating great-looking documents becomes second nature!



